Spreadsheets are an important and powerful business tool, which are used to store valuable information.
For example,
- In the financial sector, they are used for managing account information, budgets, transactions, billing, invoices, and receipts.
- In schools, teachers can use spreadsheets to track students progress, calculate grades, and identify relevant data, such as high and low scores, missing tests, and students who are struggling.
- Managing lists like telephone directories, to-do lists, grocery lists, etc.
Spreadsheets help us to manage a large amount of data in a grid type structure, with lots of other features like conditional formatting, comparison, filtering and so on.
Nowadays, the scope of spreadsheets includes web applications as well. We already have Online Spreadsheet apps like ZOHO Sheet, Google Sheets, Microsoft Office 365, Quip, Smartsheet, Airtable, etc. These applications are only used for managing spreadsheets.
But what if we want to add spreadsheet features to our web applications, for example, to display employees in an employee management system, a grade list in an online examination system or inventories in an inventory management system.
We can do a lot more by providing a spreadsheet experience in our web applications. For this purpose, we can use grids or data-tables, but these tools do not provide the same spreadsheet experience in a web application.
The best tool to provide the same spreadsheet experience in a web application is Handsontable.

Handsontable is a JavaScript Spreadsheet component for Web applications. It provides a familiar spreadsheet experience in web apps.
It is easy to use, and as customizable as possible. It can handle a very large volume of data without any performance issue.
In this article, we will take a look at the topics below:
- Handsontable is not only a standard grid or data-table, it provides the same spreadsheet experience you are already familiar with.
- It is a pure JavaScript based component.
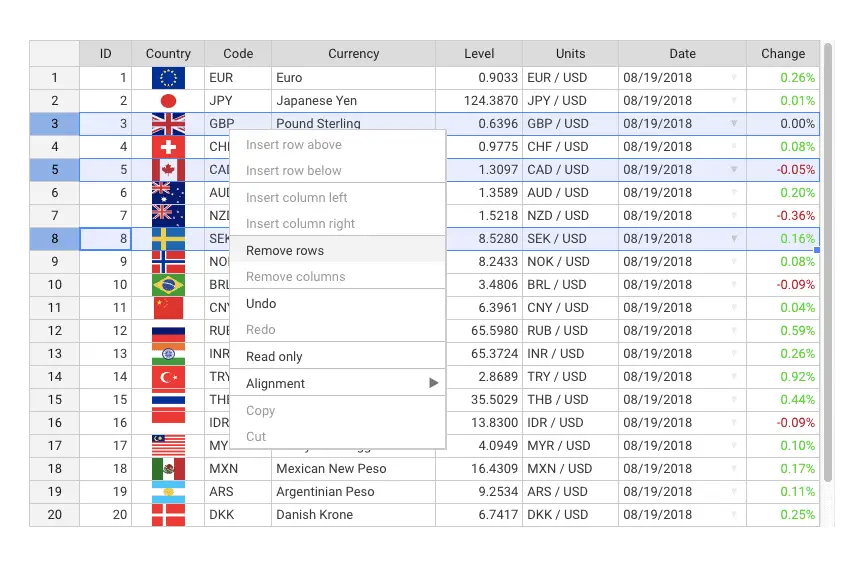
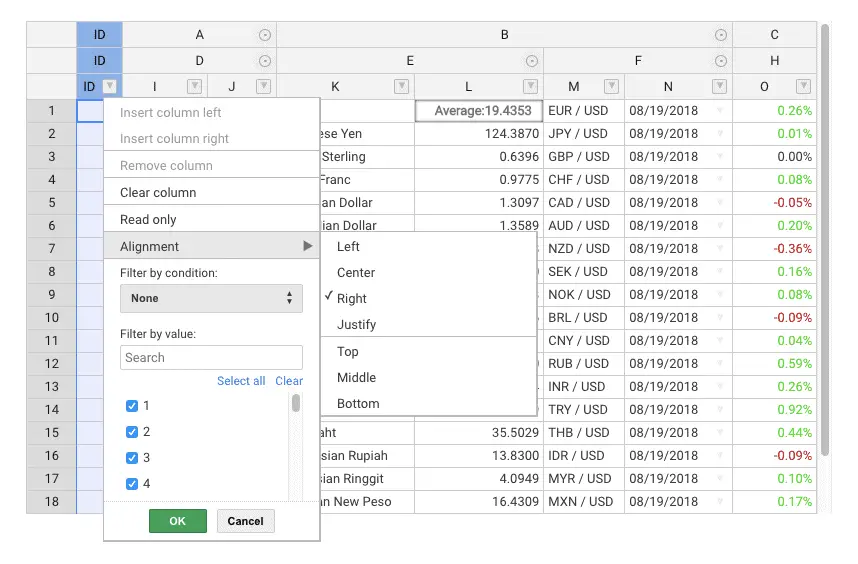
- You can perform all important Excel tasks like Cut, Copy, Merge, Insert row above/below, Insert column left/right, Remove rows/columns, Undo, Redo, Read only, Alignment, etc.
- It can be easily customized. It also binds to any source using the JSON format.
- Handsontable has a fast growing community and is currently used by thousands of developers.
- Handsontable lets you keep all your business data on your own servers.
- Handsontable works best in all modern browsers but also has backward compatibility for IE9+.
Some of the most popular features include:
- Sorting data
- Alignment
- Data validation
- Conditional formatting
- Freezing rows/columns
- Merging cells
- Defining custom cell types
- Moving rows/columns
- Resizing rows/columns
- Context menu
- Adding comments to cells
- Dragging fill handle to populate data
- Internationalization
- Non-contiguous selection
- Filtering
- Export to file
- Dropdown menu
- Nested headers
- Collapsing columns
- Hiding rows
- Hiding columns
- Trimming rows
- Column summary
- Header tooltips
- Binding rows with headers
- Formulas (alpha)
- Nested rows (alpha)
- Gantt Chart (beta)


Handsontable For Popular Frameworks
Handsontable uses wrappers and directives to support the most popular front-end frameworks

Handsontable for Angular is the official Angular wrapper for Handsontable.
We will look at a step by step usage of Handsontable in Angular 2+.
We will create a separate Angular 6 project named handsontable-demo.
Note: For demo purposes, I have created a separate project. You can directly
include it in your existing application
Create a new project using
ng new handsontable-demo
Once the Angular project is created, install Handsontable.
Install Handsontable
Use the npm command below to add Handsontable to the Angular application.
npm install handsontable @handsontable/angular
Include CSS
Once the package is installed, add the CSS import statement below to styles.css
@import '~handsontable/dist/handsontable.full.css';
Import HotTableModule
Import HotTableModule from @handsontable/angular into AppModule, and add it to the @NgModule.imports array as shown below:
import { BrowserModule } from '@angular/platform-browser';
import { NgModule } from '@angular/core';
import { AppComponent } from './app.component';
import { HotTableModule } from '@handsontable/angular';

@NgModule({
  declarations: [
    AppComponent
  ],
  imports: [
    BrowserModule,
    HotTableModule.forRoot()
  ],
  providers: [],
  bootstrap: [AppComponent]
})
export class AppModule { }
Now we are ready to use Handsontable in our application, but before that let’s setup our dataset.
Setup Dataset
Currently, we are not getting data from the server. So here we will create a mock data file and get data from that file.
Here I have created a separate cardata.ts file which contains 2.5K + car sales records in JSON format as shown below:
export const CARS = [
  {
    "Year": 2007,
    "Month": 1,
    "Make": "Volkswagen",
    "Model": "Volkswagen Passat",
    "Quantity": 1267,
    "Pct": 10
  },
  {
    "Year": 2007,
    "Month": 1,
    "Make": "Toyota",
    "Model": "Toyota Rav4",
    "Quantity": 819,
    "Pct": 6.5
  },
  ...
  ...
];
Note : This is just a sample snippet. In cardata.ts, the CARS array contains 2.5K+ records. For the original file refer to source code at
https://github.com/ngdevelop-tech/angular-handsontable/…/cardata.ts
Display Handsontable in the template
We will get data from cardata.ts and save it in the dataset variable of app.component.ts.
Now to display this dataset as a Handsontable spreadsheet, you just need to add a <hot-table> tag to the template as shown below:
<hot-table [colHeaders]="true" [rowHeaders]="true" [data]="dataset"></hot-table>
Here,
The [colHeaders] and [rowHeaders] properties are used to show column headers and row headers, respectively.
The [data] property is bound with the dataset property.
Our final app.component.html will look like this:
<div style="text-align:center">
<h1>
    Handsontable Demo
</h1>
</div>
<div>
   <hot-table [colHeaders]="true" [rowHeaders]="true" [data]="dataset"
              [height]="600" [width]="600" >
   </hot-table>
</div>
Now run the application using ng serve.
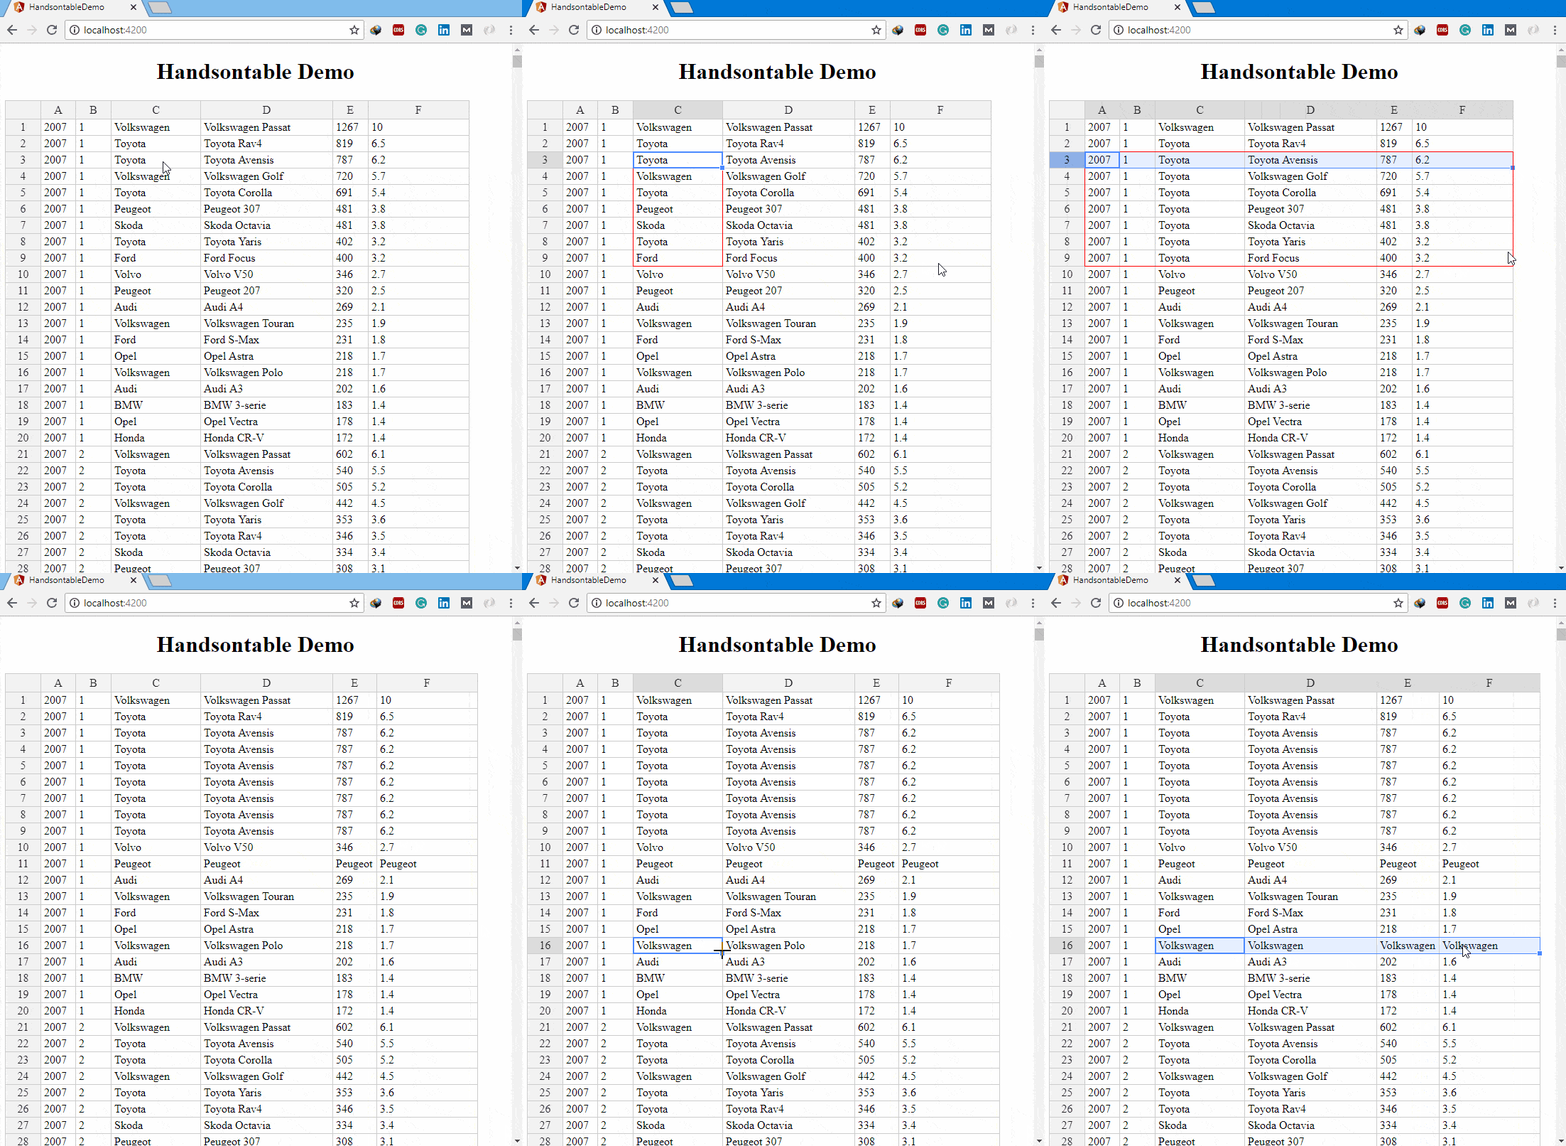
You will get a spreadsheet on the screen as shown below, with default features like Column selection, Row selection, Editing, Copy/Paste, and Drag.

Now let’s customize this spreadsheet.
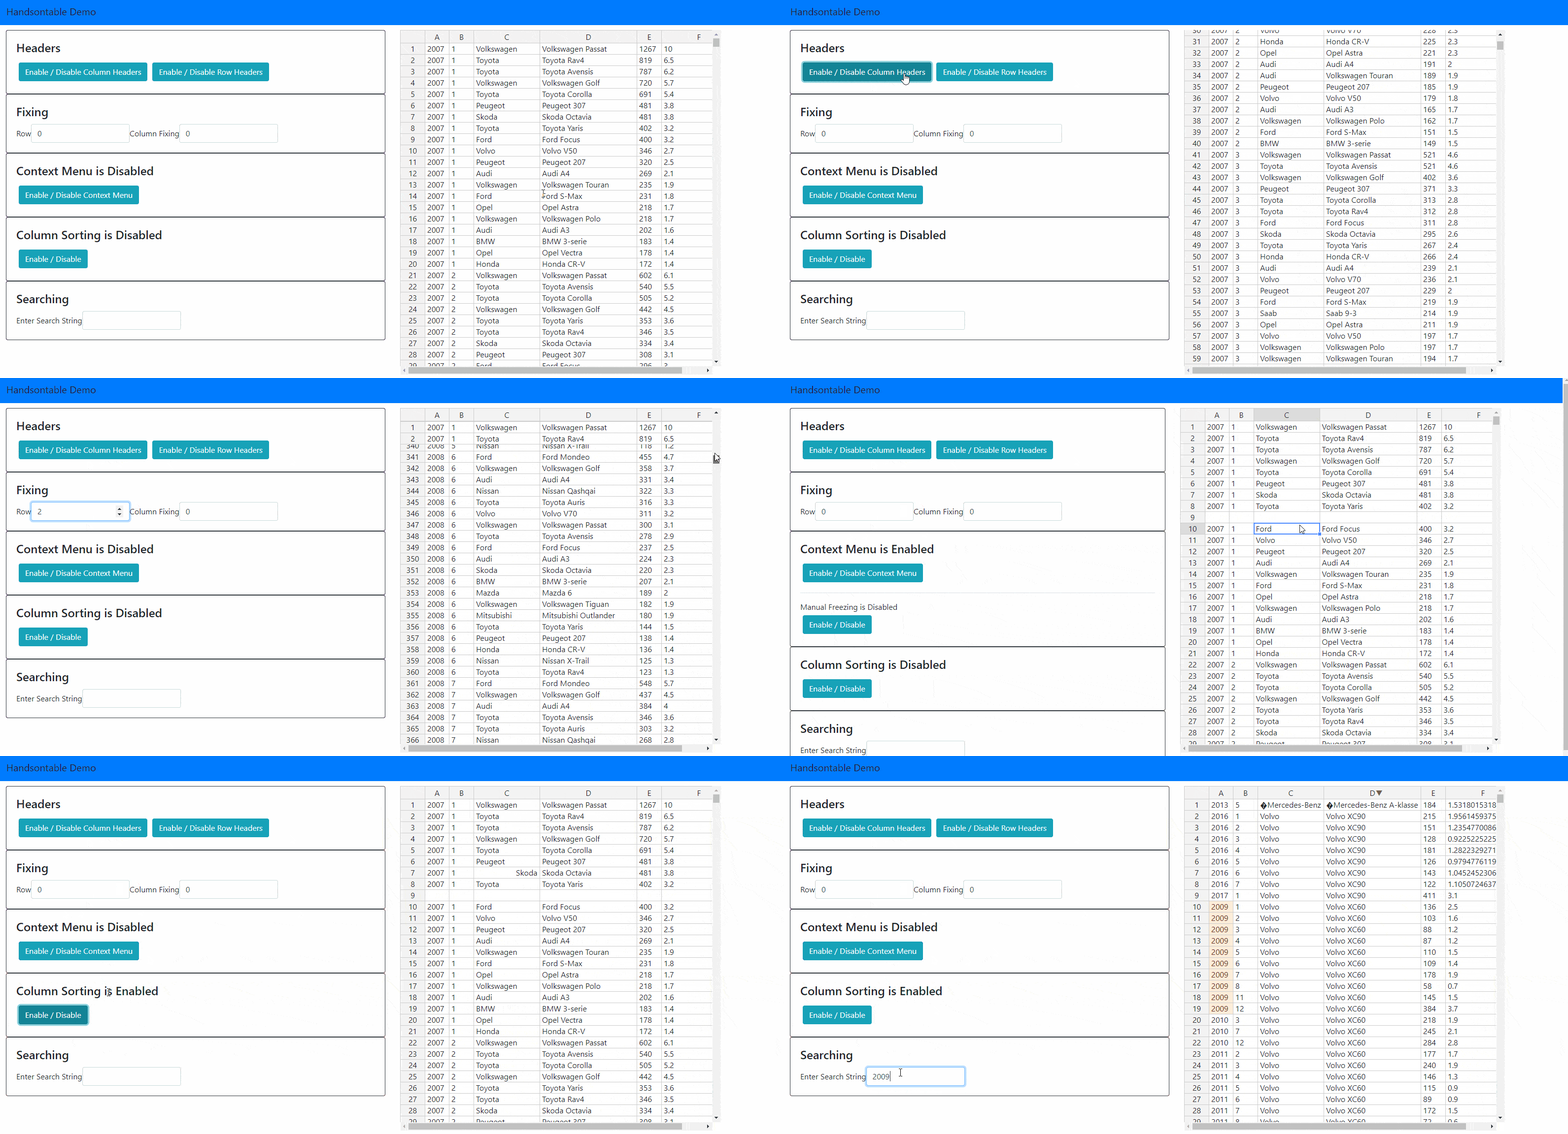
Scrolling : To make the grid scrollable, set constant width and height using the [width] and [height] properties of <hot-table> as shown below :
<hot-table [colHeaders]="true" [rowHeaders]="true" [data]="dataset" [height]="600" [width]="600" ></hot-table>
Then, if the table contains enough rows or columns, you can scroll through it.
Fixing : You can fix rows on the top or columns on the left by using the [fixedRowsTop] and [fixedColumnsLeft] properties. For example, to fix the top two columns we need to set [fixedRowsTop]="2".
Context Menu: You can control the visibility of the context menu through the [contextMenu] Boolean value. By default, it is false. If you enable it, you get the following list of options:
- Insert row above/below
- Insert column left/right
- Remove row/column
- Read only
- Alignment
- Cut
- Copy
- Freeze / Unfreeze column
Manual Freezing : Manual Freezing allows us to freeze a column using the context menu option. You can enable it by setting [manualColumnFreeze] as true.
Sorting : You can enable sorting at the table level by setting the [columnSorting] property as true or passing an object containing a column index and the sortOrder property.
We can show the sorting indicator by enabling the [sortIndicator] property.
Refer the https://docs.handsontable.com/4.0.0/demo-sorting.html for more information.
Searching : We can enable Search Plugin in Handsontable by enabling the [search] property. When enabled, Search Plugin exposes a new method query(queryStr), where queryStr is a string to be found within the table. By default, the search is case-insensitive.
We need to handle this method inside the component. To get a hot-table instance inside the component, we need to inject the HotTableRegisterer dependency into the constructor as shown in the second window below. We will get this hot-table using the getInstance(‘hot-Id’) method of HotTableRegisterer.
hot-Id is the property provided in <hot-table> as shown below:
<hot-table hotId="car_table" [colHeaders]="options.columnHeaders"
           [rowHeaders]="options.rowHeaders" [data]="dataset" [search]="true">
</hot-table>
We will get this instance in the searchValue method of the component as shown below:
import {CARS } from './cardata';
import { HotTableRegisterer } from '@handsontable/angular';
…
export class AppComponent {
  dataset = CARS;
  …
  constructor(private _hotRegisterer: HotTableRegisterer) { }

  searchValue($event){
    const instance = this._hotRegisterer.getInstance('car_table');
    instance.getPlugin('Search').query($event.target.value);
    instance.render();
  }
}
In the template we will call this method in the search string input. <input class="form-control" name="searchString" (input)="searchValue($event)" >
Same way, we can implement other features of Handsontable in Angular. Refer the Handsontable Docs for more information.
Final Code Review
Note : I have used Bootstrap for the user interface. Refer the Bootstrap installation in Angular.
import { Component } from '@angular/core';
import {CARS } from './cardata';
import { HotTableRegisterer } from '@handsontable/angular';
@Component({
  selector: 'app-root',
  templateUrl: './app.component.html',
  styleUrls: ['./app.component.css']
})
export class AppComponent {
  title = 'app';
  dataset = CARS;

  options = {
    rowHeaders : true,
    columnHeaders : true,
    fixedRowsTop : 0,
    fixedColumnsLeft : 0,
    contextMenu : false,
    manualColumnFreeze : false,
    columnSorting : false
  }

  constructor(private _hotRegisterer: HotTableRegisterer) { }

  searchValue($event){
    const instance = this._hotRegisterer.getInstance('car_table');
    instance.getPlugin('Search').query($event.target.value);
    instance.render();
  }

}
<nav class="navbar navbar-expand-md navbar-light bg-primary">
  <a class="navbar-brand">Handsontable Demo</a>
</nav>

<div class="container-fluid">


  <div class="row">
    <div class="col-md-6">
      <div class="card border-dark">
        <div class="card-body">
          <h4 class="card-title">Headers</h4>
          <button type="button" class="btn btn-info" (click)="options.columnHeaders = !options.columnHeaders">Enable / Disable Column Headers</button>
          <button type="button" class="btn btn-info" (click)="options.rowHeaders = !options.rowHeaders">Enable / Disable Row Headers</button>
        </div>
      </div>
      <div class="card border-dark">
        <div class="card-body">
          <h4 class="card-title">Fixing</h4>
          <form class=" form-inline">
            <div class="form-group">
              <label for="">Row </label>
              <input class="form-control" name="fixedRows" [(ngModel)]="options.fixedRowsTop" type="number">
            </div>
            <div class="form-group">
              <label for="">Column Fixing</label>
              <input type="number" class="form-control" name="fixedColumns" [(ngModel)]="options.fixedColumnsLeft">
            </div>
          </form>

        </div>
      </div>
      <div class="card border-dark">
        <div class="card-body">
          <h4 class="card-title">Context Menu is  <span *ngIf="!options.contextMenu">Disabled</span> <span *ngIf="options.contextMenu">Enabled</span>  </h4>
          <button type="button" class="btn btn-info" (click)="options.contextMenu = !options.contextMenu">Enable / Disable Context Menu</button>

          <div *ngIf="options.contextMenu">
              <hr>
          Manual Freezing is  <span *ngIf="!options.manualColumnFreeze">Disabled</span> <span *ngIf="options.manualColumnFreeze">Enabled</span>
          <br>
          <button type="button" class="btn btn-info" (click)="options.manualColumnFreeze = !options.manualColumnFreeze">Enable / Disable </button>
          </div>
        </div>
      </div>
      <div class="card border-dark">
        <div class="card-body">
          <h4 class="card-title">Column Sorting is <span *ngIf="!options.columnSorting">Disabled</span> <span *ngIf="options.columnSorting">Enabled</span>  </h4>
          <button type="button" class="btn btn-info" (click)="options.columnSorting = !options.columnSorting">Enable / Disable</button>
        </div>
      </div>
      <div class="card border-dark">
          <div class="card-body">
            <h4 class="card-title">Searching</h4>
            <form class=" form-inline">
              <div class="form-group">
                <label for="">Enter Search String </label>
                <input class="form-control" name="searchString" (input)="searchValue($event)" >
              </div>
            </form>

          </div>
        </div>


    </div>


    <div class="col-md-6">
      <hot-table hotId="car_table" [colHeaders]="options.columnHeaders"
                  [fixedRowsTop]="options.fixedRowsTop"
                  [fixedColumnsLeft]="options.fixedColumnsLeft"
                  [rowHeaders]="options.rowHeaders"
                  [data]="dataset"
                  [height]="700" [width]="650"
                  [contextMenu]="options.contextMenu"
                  [manualColumnFreeze]="options.manualColumnFreeze"
                  [columnSorting]="options.columnSorting"
                  [sortIndicator]="true"
                  [search]="true"> </hot-table>


    </div>

  </div>

</div>
import { BrowserModule } from '@angular/platform-browser';
import { NgModule } from '@angular/core';
import { AppComponent } from './app.component';
import { HotTableModule } from '@handsontable/angular';
import { FormsModule } from '@angular/forms';
@NgModule({
declarations: [
AppComponent
],
imports: [
BrowserModule,
FormsModule,
HotTableModule.forRoot()
],
providers: [],
bootstrap: [AppComponent]
})
export class AppModule { }
Final Output


